Hello everyone,
Hope everyone is having a great week. It's almost March break where I live, and I am so looking forward to it. March break is all about relaxing, and doing the things I love. I will be making some cupcakes, and showing how to decorate cupcakes so that they stand out. These will definitely wow the loved ones! ;)
Happy crafting!
Thursday, 7 March 2013
Saturday, 9 February 2013
Diy: Glitter Pencil & Binder
Hello!
Hope everyone had a great week! It was a very busy week for me. Where I live, the new semester has just started. I love buying new stationary supplies but, this year, I decided to decorate my pencils and decorate the old binders I have. This project is very simple, and fun!
So let's begin...

Step 1: Coat the pencil with Mod Podge using a brush.

Step 2: Roll the pencil in fine glitter, until the pencil is completely covered with the glitter.
 Step 3: Let the pencil dry, once you are happy with your design.
Step 4: After the pencil is slightly dry, coat a thin layer of Mod Podge to prevent the glitter from falling. Once it's dry, you are done!!!

For the binder:
My sister needed a binder for her vocals class. She already had an old, black binder that she used last semester for grade 11 Chemistry. But, she wanted the vocals binder to represent her love for music!


Step 4: Let the Mod Podge dry completely. (For my sister's binder, I let the Mod Podge dry completely, and then used a silver glitter Mod Podge mix to make a treble clef in the middle. My sister loves her unique binder!)
Step 5: Your new unique binder is done and ready to be used!!! ;)
Hope everyone had a great week! It was a very busy week for me. Where I live, the new semester has just started. I love buying new stationary supplies but, this year, I decided to decorate my pencils and decorate the old binders I have. This project is very simple, and fun!
So let's begin...
Materials:
For the Pencil:
Step 1: Coat the pencil with Mod Podge using a brush.
Step 2: Roll the pencil in fine glitter, until the pencil is completely covered with the glitter.
Step 4: After the pencil is slightly dry, coat a thin layer of Mod Podge to prevent the glitter from falling. Once it's dry, you are done!!!
For the binder:
My sister needed a binder for her vocals class. She already had an old, black binder that she used last semester for grade 11 Chemistry. But, she wanted the vocals binder to represent her love for music!
Step 1: Tape the edges of the binder.
Step 2: Mix the glitter (any color(s)) into the Mod Podge.
Step 3: Spread the Mod Podge mix on to the binder. You can create any design you like, using a paint brush.
Step 4: Let the Mod Podge dry completely. (For my sister's binder, I let the Mod Podge dry completely, and then used a silver glitter Mod Podge mix to make a treble clef in the middle. My sister loves her unique binder!)
Step 5: Your new unique binder is done and ready to be used!!! ;)

Wednesday, 6 February 2013

Thursday, 31 January 2013
DIY: Hair clip holder!
My sister loves hair clips!
For her 16th birthday, I decided to make a cute hair clip holder with some DIY hair clips.
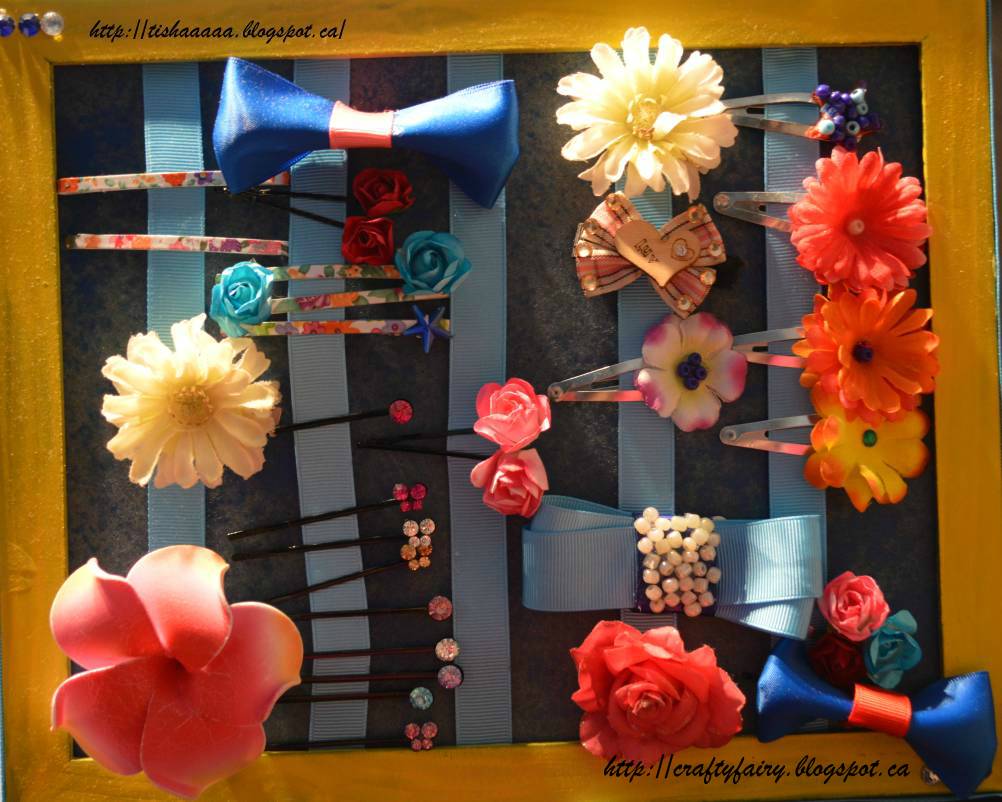 Supplies:
Spray paint the frame you have with the spray paint of your choice. It usually takes 24hrs for the paint to completely dry. Once this is done, flip the frame over. Cut as many strips you want to add to the frame. Make sure the strips of the ribbons are bit longer than the frame, pull the ribbon tight across the back of the frame (if you are planning to keep the back cover of the frame, do NOT pull the ribbon too tight) & start hot gluing them. Once all of the ribbon strips are glued across the back of the frame, trim the excess ribbon. Finally,clip on the hair clips to the ribbon & place the cute frame where you like!
Happy Crafting! ;)
For her 16th birthday, I decided to make a cute hair clip holder with some DIY hair clips.
- A Frame (any size)
- Ribbons (any colours you like!)
- Hot glue gun with extra glue sticks
- Spray paint (any colour)
Spray paint the frame you have with the spray paint of your choice. It usually takes 24hrs for the paint to completely dry. Once this is done, flip the frame over. Cut as many strips you want to add to the frame. Make sure the strips of the ribbons are bit longer than the frame, pull the ribbon tight across the back of the frame (if you are planning to keep the back cover of the frame, do NOT pull the ribbon too tight) & start hot gluing them. Once all of the ribbon strips are glued across the back of the frame, trim the excess ribbon. Finally,clip on the hair clips to the ribbon & place the cute frame where you like!
Happy Crafting! ;)
Subscribe to:
Comments (Atom)